
The Scheduling grid displays a calendar view of availability status for your resources. Each row represents a resource. Each column represents a day within the selected date range. Use this grid to set, edit, and review scheduling status for resources across any date range.
Scheduling status controls whether a resource appears as available to dispatchers in Desktop, SAVE, and Mobile on a given date.
Before you begin: The Scheduling grid requires at least one filter to be active before it will display records. If you have configured default filters in Configuration, they will be applied automatically. Otherwise, set filters manually using the Resources Filter icon. See Configuration for instructions on setting defaults.

Layout
Date Range
The Start Date and End Date fields at the top of the page control the date range displayed in the grid. Adjust these to navigate to the period you want to view or edit.
Grid Cells
Each cell represents one resource on one day. Cell colors indicate scheduling status:
|
Color |
Meaning |
|---|---|
|
Colored block with label |
A scheduling status has been set for that resource on that day. The label shows the status name and time range. |
|
Pink |
The resource is marked as Unavailable on that day. |
|
Empty (white) |
No scheduling status has been set for that day. |
Toolbar
|
Icon |
Label |
Description |
|---|---|---|
|
Funnel |
Resources Filter |
Opens the filter panel. Filter by Admin Division and Infrastructure to control which resources appear in the grid. |
|
Calendar with plus |
New Scheduling |
Opens the scheduling entry form to create a new scheduling status for a resource. |
|
Calendar with minus |
Remove Scheduling |
Removes the selected scheduling entry. |
|
Calendar with dot |
Go to Today |
Jumps the grid view to the current date. |
|
Printer |
Print Scheduling |
Prints the current scheduling view. |
Common Tasks
Set Filters on the Scheduling Grid
If you have not configured default filters, set them before creating or editing schedules. The grid will not display resources until at least one filter is active.
-
Click the Resources Filter icon (funnel) in the toolbar.
-
Select the desired Admin Division and/or Infrastructure filter values.
-
Select the resources you want to display in the grid.
-
Click Save.
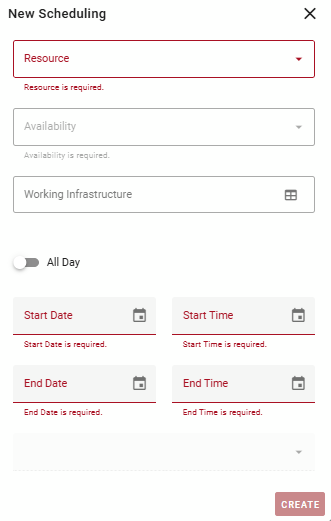
Create a New Scheduling Entry
-
Click the New Scheduling icon in the toolbar.
-
Complete the scheduling entry form. Required fields are indicated in red.
-
Click Save.
Create a Recurring Scheduling Entry
Use this to set a status that repeats over a defined period (for example, a standard shift running daily through a season).
-
Click the New Scheduling icon in the toolbar.
-
Complete the resource, status, start date, and time fields.
-
Enable the recurrence option.
-
Set the End Date to define when the recurrence stops.
-
Click Save.
To schedule a resource for an entire season, set the End Date to the last day of the season. The status will repeat daily through that date without requiring daily manual entry.
Edit an Existing Scheduling Entry
-
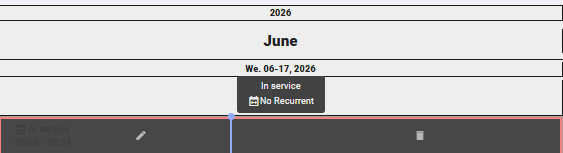
Click the scheduling entry cell for the resource and date you want to edit. Edit (pencil) and Delete (trash can) options appear.
Edit Scheduling -
The fields in the form will appear grayed out and not editable. Click the pencil icon that appears next to the resource name to enable editing.
-
Update the fields you would like to change.
-
Click Save.
Remove a Scheduling Entry
-
Click the scheduling entry cell for the resource and date you want to edit. Edit (pencil) and Delete (trash can) options appear.
Edit Scheduling -
Click Delete. Note that verification is not required.
Copy a Scheduling Entry to Another Resource
Use this to duplicate a single scheduling entry from one resource to another of the same resource type.
You can only copy scheduling entries between resources of the same type. Copying between different resource types is not supported.
-
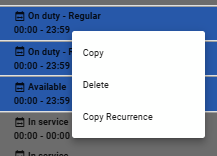
Right-click the scheduling entry you want to copy and select Copy.
-
Left-click the cell for the destination resource on the same date to apply the copied entry.
Copy a Recurring Scheduling Entry to Another Resource
-
Right-click the recurring scheduling entry you want to copy and select Copy Recurrence.
-
Left-click the cell for the destination resource to apply the copied recurrence.
You can only copy scheduling entries between resources of the same type. Copying between different resource types is not supported.