
A roster is a saved grouping of resources that typically respond to incidents together. For example, a dozer operator, a dozer, and a transport vehicle can be grouped into a single roster so all three are dispatched together rather than individually.
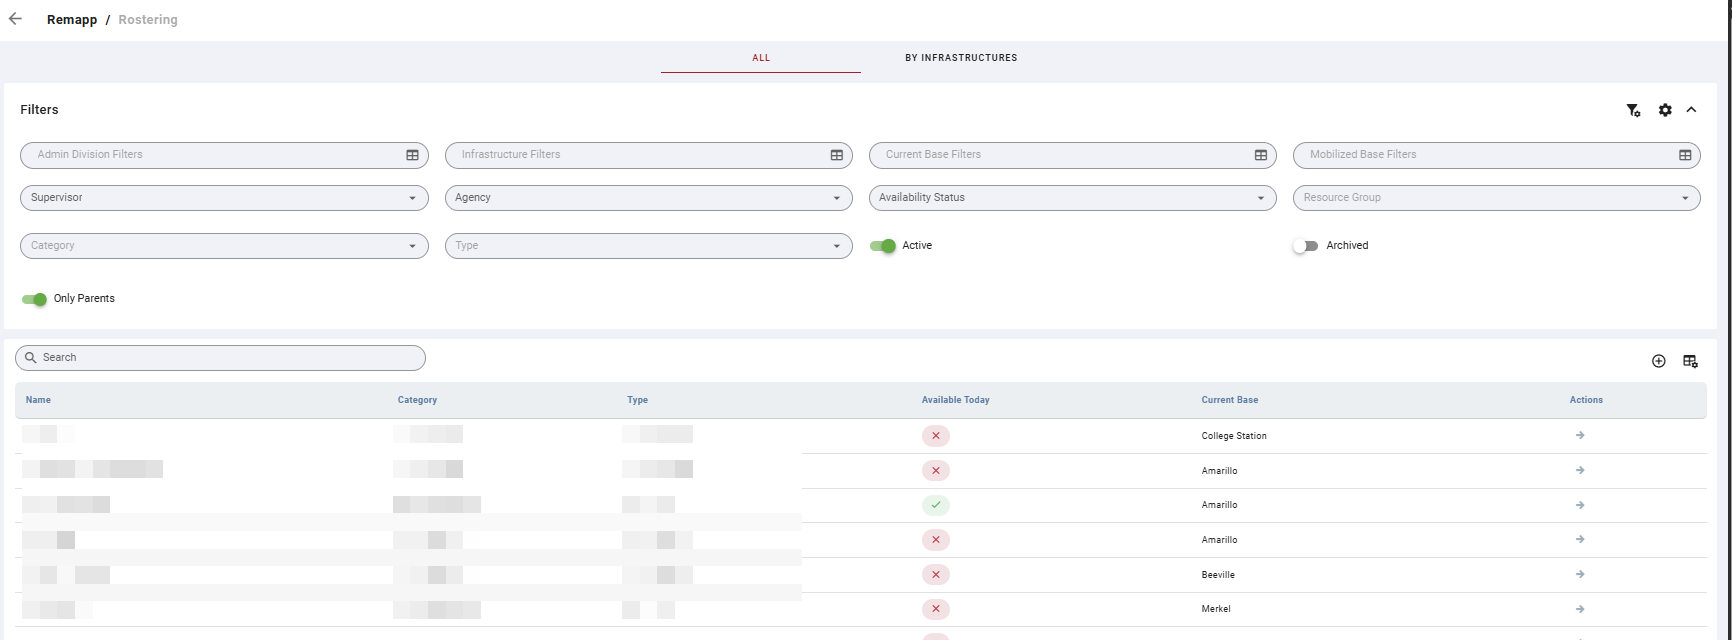
Rosters are visible to dispatchers in Desktop, SAVE, and Mobile. They do not expire: a roster remains active until it is modified or removed.
Before you begin: The Rostering grid requires at least one filter to be active before it will display records. If you have configured default filters in Configuration, they will be applied automatically. See Configuration for instructions on setting defaults.
Layout
Tabs
The Rostering page has two views: All and By Infrastructures. Toggle between the tabs at the top of the page. Use All to view and manage rosters across your organization. Use By Infrastructures to view rosters filtered to a specific infrastructure such as a station or base.
Filters
Filters (in dropdown, multi-select, and toggle formats) are available at the top of the grid view. If you have configured default filters in Configuration, they will be applied automatically when you open this grid. See Configuration for instructions on setting defaults.
A Search bar also appears below the Filters.
By default, the Rostering grid displays Parent resources only. To disable this filter, click the down arrow and set the Only Parents toggle as disabled.
All Tab
Table Actions
|
Icon |
Label |
Description |
|---|---|---|
|
Circle with plus |
Add |
Opens a form to create a new roster. |
|
Grid with gear |
Toggle Columns |
Opens column visibility controls. |
Row Actions
|
Icon |
Action |
Description |
|---|---|---|
|
Arrow |
Open Roster |
Opens the roster editor for this resource, showing the Roster List and available Resources. |
By Infrastructures Tab
The By Infrastructures tab displays rostering status for all resources associated with a specific infrastructure. This view requires an Infrastructure filter to be set before records will display.
Rostering Status
Indicates the completeness of the resource's roster assignment.
|
Indicator |
Meaning |
|---|---|
|
Orange triangle |
Excess of children (the roster has more resources assigned than the defined capacity). |
|
Red exclamation point |
Missing children (the roster has fewer resources assigned than the defined capacity). |
Row Badge (Number)
The small number on the left side of each row indicates how many child resources are currently assigned to that roster. Click the expand arrow on the row to view the assigned resources.
Row Actions
|
Icon |
Action |
Description |
|---|---|---|
|
Arrow |
Open Roster |
Opens the roster editor for this resource. |
Common Tasks
Create or Edit a Roster
-
Use the filters to locate the resource you want to roster.
-
Click the arrow in the Actions column of that resource to open the roster editor.
-
Click Edit.
-
In the Roster List, click the expand arrow to view available roster slots.
-
In the Resources List, click and hold a resource, then drag it to an open slot in the Roster List.
-
Click Save.
View Rostering Status by Infrastructure
-
Click the By Infrastructures tab.
-
Set an Infrastructure Filter to display resources for that location.
-
Review the Rostering Status column. An orange triangle indicates the roster has more resources assigned than its defined capacity.
-
Click the arrow in the Actions column to open and edit the roster for any resource.
Show All Resources Including Non-Parents
By default, the All tab shows only parent resources — the top-level resource in each roster group. To see all resources regardless of roster status:
-
In the All tab, locate the Only Parents toggle in the Filters section.
-
Disable the Only Parents toggle.
The grid will refresh to show all resources.