There are three ways to search for an incident and open its Incident Card.
-
From the Incident List: search, filter, or browse for an incident on the left hand Incident List menu.
-
Main App Search: use the search bar at the top right of the Map Canvas to search for an incident by name.
-
Selecting on the Map: click any incident on the map to view an Incident Pop-up with details about the incident.
For specific step-by-step instructions, see Incident Workflows.
Incident List
Open the Incident List from the left hand Main Toolbar.
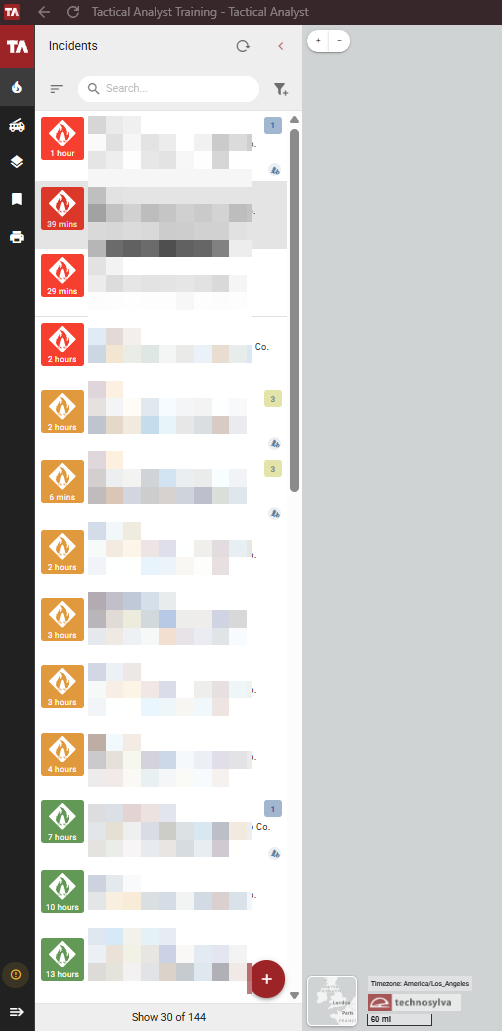
The Incident List displays all active incidents in your deployment. Use the collapse arrow in the upper right to hide the panel and maximize the map canvas.
Use the Search bar to filter incidents by name. Select the Sort icon to sort the incident list by name, reported date, or last edited.
Select the Filter icon to Clear filters or Go To Filters. A blue dot on the filter appears if the incidents are currently filtered.
Each incident entry displays the following:
-
Incident icon - Color coded to indicate incident kind (e.g. Fire, Hazardous Conditions, etc.).
-
Time badge - Time elapsed since the incident was last updated.
-
Incident name - The name of the incident.
-
Incident code - The full incident identifier.
-
Location - The county or geographic area of the incident.
-
Date and time - The reported date and time.
-
Size and containment - Current acreage and percent contained.
-
Content indicators - Small icons in blue indicating what content has been added to the incident, such as photos, videos, and files. See the Incident Card to view content.
-
Incident status - a gray icon appears if the incident has been archived. A red lock icon appears if the incident is in Approval mode.
-
IAA badge - Displays the Initial Attack Assessment rating from the most recent published simulation, if available.
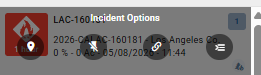
Incident Options
Hover over an incident on the Incident List to get options for that incident:
-
Location - Zoom to the incident.
-
Pin Incident/Remove Pin - Pin or unpin the incident.
-
Copy Incident - Copy the incident URL.
-
Open Incident - Open the incident to see the Incident Card.
Click the red + at the bottom right of the Incident Panel to Create Incident.
Incident Fall-Off Rules
Incidents will automatically be archived based on size of the incident and when it was edited.
Fall-off rules are used to ensure that stale incidents are not retained. Incidents are archived under any of the following conditions:
-
Fire size is less than 10 acres AND fire information has not been updated in more than 3 days.
-
Fire size is between 10 and 100 acres AND fire information has not been updated in more than 8 days.
-
Fire size is larger than 100 acres AND fire information has not been updated in more than 14 days.
Incident Pop-Up
Click an incident on the Map Canvas to view a pop-up with details about the incident. Click the Incident Card button to open the Incident card or use the buttons in the bottom right of the pop-up to Copy Coordinates to Clipboard or Create Bookmark from Location.
If clicking on an incident yields information about a different map layer, use the arrows at the top of the pop-up to browse through available layers until you see the incident details.
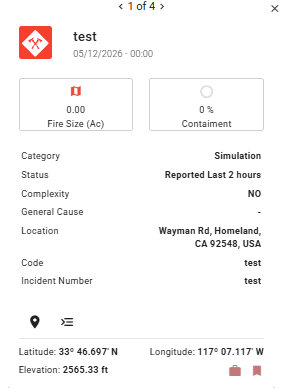
Incident Cards
When an incident is selected, it opens in the Incident Card panel on the right side of the screen. This is where you view incident details, manage mapping, access media and files, and work with supporting tools for that incident.
The Incident Card remains open as a separate panel so you can continue using other application tools. Only one incident can be open at a time. Use Pinned Incidents to switch between incidents quickly.
The tabs along the left side of the Incident Card provide access to different topics related to the incident.
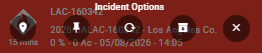
The Incident Card header displays the incident name, number, location, time since last update, current size, and status. From the header you can also access the Working Board controls, and toggle Incident Mode between Open and Approval. Hover over the header for Incident Options:
-
Location - Zoom to the incident.
-
Pin Incident/Remove Pin - Pin or unpin the incident.
-
Reload Incident - Refresh the incident details.
-
Archive Incident - Archive the incident (Choose Now or Specify a Date).
-
X - Close the Incident Card.
To maximize the map canvas, hide the Incident Card by clicking the hide control (red tab) in the header. Click it again to restore the panel.
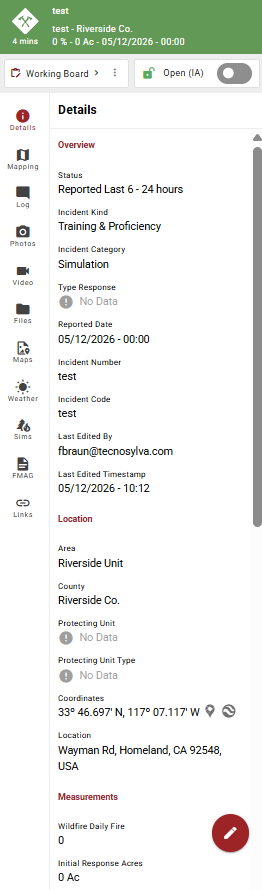
Details Tab
The Details tab is the default tab when an incident is opened. It displays information about the selected incident organized into the following sections: Overview, Location, Measurements, and Assessments.
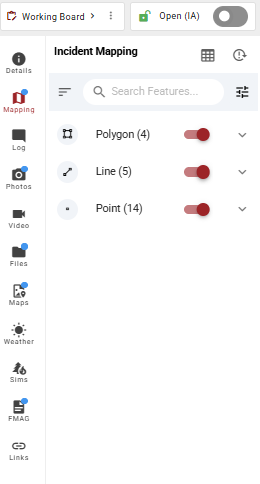
Mapping Tab
The Mapping tab displays all mapping features associated with the selected incident and board. When no features have been added, the panel displays "No features available."
The toolbar at the top of the Mapping tab provides the following controls:
-
Search Features - Filter the feature list by name.
-
Sort - Sort the feature list by feature properties.
-
Filter - Filter the feature list by feature properties.
-
Open Features Panel - Opens the Features Panel at the bottom of the map canvas. This can also be opened by selecting Draw Feature as described below.
-
Refresh - Refreshes the incident data.
Select the + button in the lower right of the panel to add a new feature. You will be prompted to either Upload [KML, KMZ, GeoJSON, Shapefiles] or Draw Feature directly on the map canvas. Selecting Draw Feature opens the Incident Mapping Grid.
When features are available for the selected incident, they are displayed by geometry type.
Log Tab
The Log tab displays messages posted to the selected incident. Messages are organized chronologically and show the author, timestamp, and message content. Each message is color coded to indicate which group it belongs to.
Messages can be filtered by group using the filter controls at the top of the panel. Active filters are displayed as removable tags. Select the X on any tag to remove that filter.
Select the three-dot menu on any message to access the following options:
-
Edit - Edit the message content.
-
Delete - Permanently delete the message.
Type a message in the text field at the bottom of the panel and select the send button to post it to the Log.
Photos Tab
The Photos tab displays photos uploaded to the selected incident. Each entry shows the filename, upload date and time, file size, and the uploader's email address.
Select Upload File at the top of the panel to add a photo to the incident. The maximum file size is 100 MB. Accepted formats include any conventional image type such as: .jpg, .jpeg, .jpe, .png, .gif, .webp, .svg, .bmp, .ico, .cur, .tif, .tiff, .heif, .heic.
Check Show on Map to plot all photos as pins on the map canvas at their coordinates.
Use the Search bar to filter photos by name. Use the Sort and Filter controls to organize the list by file properties.
Select the download icon next to the search bar to download photos from the list.
Select the three-dot menu on any photo to access the following options:
-
Zoom To - Zooms the map canvas to the location where the photo was taken.
-
View Detail - Opens the photo preview panel.
-
Download - Downloads the photo to your device.
-
Edit - Edit the photo details.
-
Delete - Permanently deletes the photo from the incident.
-
Share - Share the photo to a board of your choosing.
-
Archive - Archives the photo. To unarchive it, toggle the Show Archived option at the bottom of the menu to the On position, select the Archived photo and choose, Unarchive from the photo actions dropdown.
Photo Preview
Selecting View Detail opens a preview of the photo. The preview displays the image along with the filename, date and time, location, and uploader. Select Download to save the photo to your device. Use the rotate and fullscreen controls to adjust the view.
Video Tab
The Videos tab is nearly identical to the Photos tab but displays videos uploaded to the selected incident. Each entry shows the filename, upload date and time, file size, and the uploader's email address.
Select Upload File at the top of the panel to add a video to the incident. The maximum file size is 100 MB. Accepted formats include any conventional video type such as: .mp4, .mpg4, .mp4v, .mkv, .webm, .mov, .qt, .f4v, .flv, .m4v, .ogv, .avi, .wmv, .mpg, .mpeg, .mpe, .3gp, .3g2
Check Show on Map to plot all videos as pins on the map canvas at their coordinates.
Use the Search bar to filter videos by name. Use the Sort and Filter controls to organize the list by video properties.
Select the download icon next to the search bar to download videos from the list.
Select the three-dot menu on any video to access the following options:
-
Zoom To - Zooms the map canvas to the location where the video was taken.
-
View Detail - Opens the video preview panel.
-
Download - Downloads the video to your device.
-
Edit - Edit the video details.
-
Delete - Permanently deletes the video from the incident.
-
Share - Share the video to a board of your choosing.
-
Archive - Archives the video. To unarchive it, toggle the Show Archived option at the bottom of the menu to the On position, select the Archived video and choose, Unarchive from the video actions dropdown.
Files Tab
The Files tab is nearly identical to the Photos and Videos tabs but displays files uploaded to the selected incident. Each entry shows the filename, upload date and time, file size, and the uploader's email address.
Select Upload File at the top of the panel to add a file to the incident. The maximum file size is 100 MB. All file types are accepted.
Use the Search bar to filter files by name. Use the Sort and Filter controls to organize the list by file properties.
Select the download icon at the top of the panel to download files from the list.
Toggle Show Archived at the bottom of the panel to include files that have been previously archived. Archived files are hidden by default.
Select the three-dot menu on any file to access the following options:
-
Zoom To - Zooms the map canvas to the location associated with the file.
-
Download - Downloads the file to your device.
-
Edit - Edit the file details.
-
Delete - Permanently deletes the file from the incident.
-
Share - Share the file.
-
Archive - Archives the file.
Maps Tab
The Maps tab is nearly identical to the Photos, Videos, and Maps tabs but displays maps uploaded to the selected incident. Each entry shows the filename, upload date and time, file size, and the uploader's email address.
Select Upload File at the top of the panel to add a map to the incident. The maximum file size is 100 MB. Accepted formats are .tpk, .vtpk, and .pdf (GeoPDFs will be converted to .tpk).
Use the Search bar to filter maps by name. Use the Sort and Filter controls to organize the list by map properties.
Select the download icon at the top of the panel to download maps from the list.
Toggle Show Archived at the bottom of the panel to include maps that have been previously archived. Archived maps are hidden by default.
Select the three-dot menu on any map to access the following options:
-
Download - Downloads the file to your device.
-
Edit - Edit the file details.
-
Delete - Permanently deletes the file from the incident.
-
Share - Share the file.
-
Archive - Archives the file.
Weather Tab
The Weather tab displays current and forecasted weather conditions for the incident location.
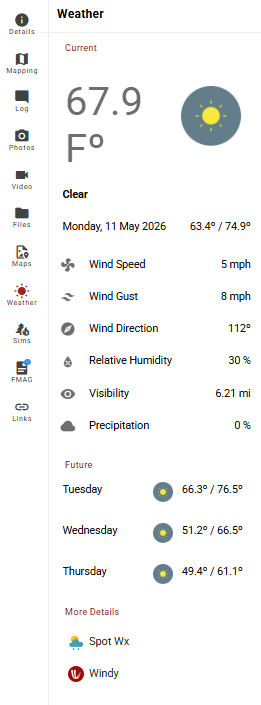
The Current section displays the current weather conditions. For more information on specific weather metrics, visit the Technosylva Weather Glossary.
Future displays a three-day forecast showing the daily low and high temperatures and general conditions for each day.
More Details provides links to external weather sources for the incident location. Selecting a link opens that service in a new tab with the incident location pre-selected. Available sources include:
Sims Tab
The Simulations tab displays fire behavior simulations published from Wildfire Analyst(WFA) for the selected incident. When no simulations have been published, the panel displays "No Simulations Available."
Simulations are generated and published externally in WFA and cannot be created from within Tactical Analyst. Select the refresh icon at the top of the panel to check for newly published simulations.
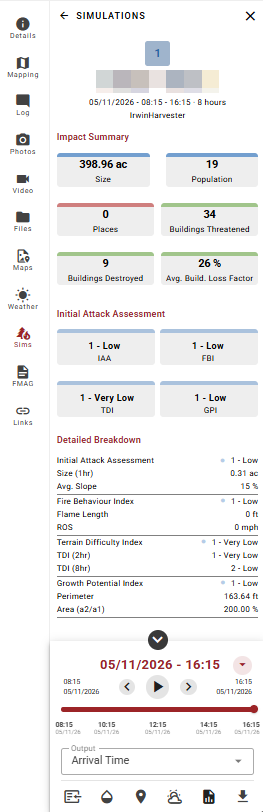
Each simulation entry displays the simulation name, projected acreage, and the date and time it was published. A number badge indicates the sequence of the simulation.
The simulation detail view displays the following information for the selected simulation:
-
Simulation name and coordinates - The name and geographic coordinates of the simulation origin point.
-
Simulation window - The start and end date and time of the simulation run.
Three metrics cards display information about the simulation’s impact:
-
Impact Summary - A summary of the simulation's projected impact displayed as metric tiles.
-
Initial Attack Assessment - Ratings for the following fire behavior and response indices. Each index is rated on a scale from Very Low to High.
-
Detailed Breakdown - A full breakdown of fire behavior metrics. For information about a particular metric, visit the Technosylva Glossary.
The timeline at the bottom of the detail view allows you to scan through the simulation output over time. Use the playback controls to animate the simulation on the map canvas, or drag the slider to a specific time. The Output dropdown allows you to select which simulation output is displayed.
Simulation Options
The toolbar at the bottom of the detail view provides additional controls for interacting with the simulation on the map canvas:
-
Detach Simulation - Detaches the simulation from the incident.
-
Opacity - Adjusts the transparency of the simulation as shown on the Map Canvas.
-
Locate - Zooms to the simulation on the map.
-
Weather - Opens the simulation’s weather as a separate window.
-
Download Report - Downloads the simulation with options for a Full or One Page report. Select the appropriate option for the intended audience.
-
Download Simulation - Downloads the simulation with options to Download Current or Download All.
FMAG Tab
The FMAG tab is not available for all customers.
The FMAG tab displays Fire Management Assistance Grant (FMAG) documents generated for the selected incident. Each entry shows the filename, the user who generated it, the date and time, and the file size.
Toggle Show Archived at the bottom of the panel to include documents that have been previously archived. Archived documents are hidden by default.
Select the three-dot menu on any entry to access the following options:
-
Download - Downloads the document to your device.
-
Delete - Permanently deletes the document from the incident.
-
Archive - Archives the document.
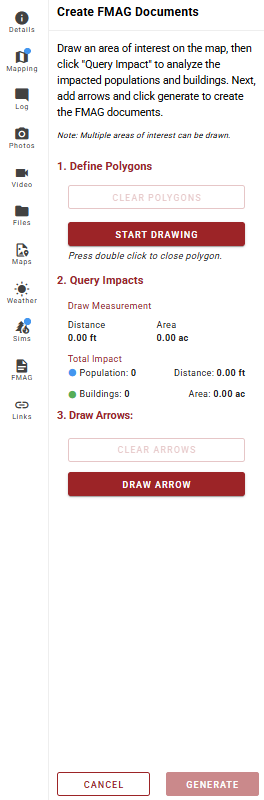
Creating FMAG Documents
Select the red + button to open the Create FMAG Documents panel. Generating FMAG documents is a three step process:
-
Define Polygons - Select Start Drawing to draw a polygon on the map canvas. Double-click to close the polygon. Select Clear Polygons to remove drawn polygons and start over.
-
Query Impacts - Once polygons are drawn, the panel displays the measured distance, area, and total impact estimate including population and number of buildings within the drawn area.
-
Draw Arrows - Select Draw Arrow to add directional arrows to the map for the FMAG document. Select Clear Arrows to remove all drawn arrows.
Once all steps are complete, select Generate to create the FMAG documents. Select Cancel to exit without generating.
After selecting Generate, the map canvas displays the drawn polygon and arrow. Use the following controls at the bottom of the screen to finalize the FMAG document:
-
Take Photo - Captures the current map view to include in the FMAG documents.
-
Adjust Frame - Reposition or resize the map frame before capturing.
-
Cancel - Exits without completing the document.
Clicking the photo icon finalizes the FMAG document. Two .pdf files (a form and a map) will appear on the FMAG list for the incident.
Use a Simulation for an FMAG Report
A fire behavior simulation can be used as the basis for a FMAG report. Using a simulation allows you to query projected impact data including estimated acreage, population, and buildings threatened, which can inform the FMAG documentation.
-
Open the Incident Card for the relevant incident.
-
Select the Simulations tab.
-
Select the time step for the simulation you want to use.
-
Select the FMAG tab.
-
Select the + button to open the Create FMAG Documents panel.
-
Follow the steps in Creating FMAG Documents to define polygons (the pinned simulation serves as the basis for defining polygons), query impacts, and draw arrows.
-
Select Generate, then capture the map photo to complete the documents.
Links Tab
The Links tab displays web links associated with the selected incident. Each entry shows the link name, date and time it was added, and the URL.
Use the Search bar to filter links by name. Use the Filter by Type dropdown to filter links by type.
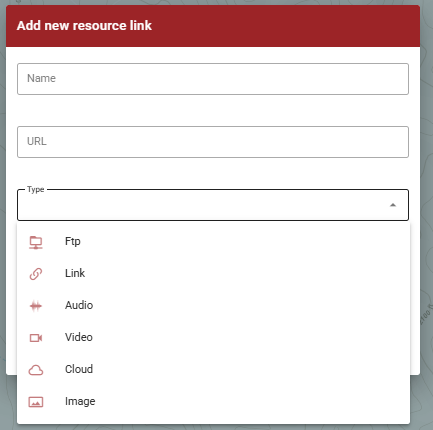
Select Add Link at the top of the panel to add a new link to the incident. Enter the Name and URL and choose the link Type from the dropdown (Ftp, Link, Audio, Video, Cloud, or Image).
Select the three-dot menu on any link entry to access the following options:
-
Copy URL - Copies the link URL to the clipboard.
-
Edit - Edit the link name or URL.
-
Delete - Permanently deletes the link from the incident.