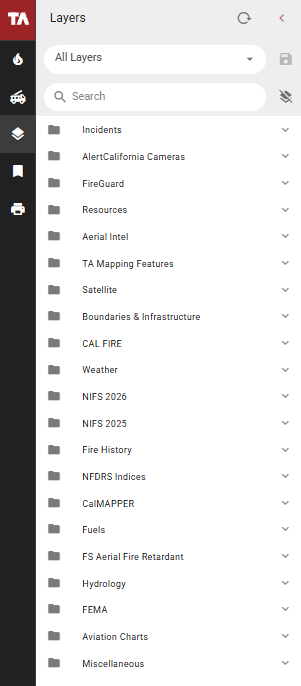
The Map Layers panel displays all available layers in Tactical Analyst. From here you can toggle layers on or off, adjust transparency, sign into credentialed layers, add your own web or local layers, and manage Quickmaps.
Select the Layers icon from the Main Toolbar to open the panel. Layers are organized into groups to help manage the list.
Layers shown here may not match your organization’s deployment.
Map Layers Basics
Search for Layers
Use the search bar at the top of the panel to filter layers by name. The list updates as you type. Select the X in the search bar to clear the search and return to the full layer list.
If a layer is inside a collapsed layer group, it may not appear in search results until the group is expanded.
Toggle Layers On and Off
Check the checkbox next to a layer to turn it on. Uncheck it to turn it off. A checked checkbox indicates the layer or layer group is active.
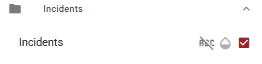
If a layer is inside a layer group, the layer group must also be turned on for the layer to display on the map.
To turn off all layers at once, select the Deselect All icon in the layer list. This turns all layers off but does not restore them. Layers must be turned back on individually.
Adjust Layer Transparency
Select the transparency icon next to a layer to open the transparency slider. Drag the slider to adjust the transparency of that layer. A red dot on the transparency icon indicates that transparency has been applied to that layer.
Sign Into Layers
Some layers require additional login credentials before they can be activated. These layers are identified by a lock icon in the layer list.
To sign into a credentialed layer:
-
Select the lock icon next to the layer.
-
Enter your username and password.
-
Select Set.
Check Remember to save your credentials so you do not need to re-enter them the next time you open Tactical Analyst.
Add Session-Based Layers
Web and local layers can be added to the map on a session basis. Added layers appear at the bottom of the layer list under a My Layers group and remain available until the page is refreshed or the browser window is closed.
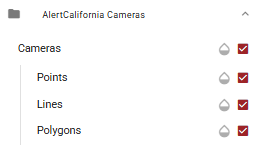
Select the + button in the lower right of the layer panel to open the New Layer Wizard. Choose one of the following methods:
Add a layer by Service URL
-
Select the Service URL option.
-
Enter the URL of the web service.
-
Select Load Layer.
Add a layer by Raw Data or File
-
Select the Raw Data option.
-
Either paste raw data directly into the text field, or drag and drop a file into the upload area on the right.
-
Select Load Layer.
Accepted file types: GeoJSON, JSON, KML, and ZIP.
Select Close to exit the wizard without adding a layer.
Quickmaps
Quickmaps are pre-set layer configurations that can be applied to the map canvas to quickly establish your operational picture. The currently active Quickmap is displayed at the top of the Map Layers panel.
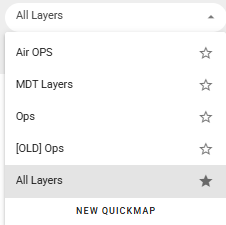
Apply a Quickmap
-
In the Map Layers panel, select the currently applied Quickmap name.
-
Select a Quickmap from the list to apply it.
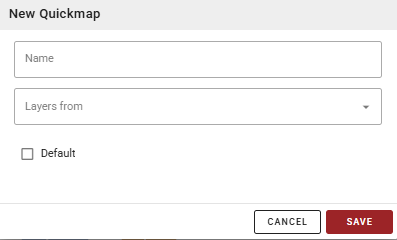
Create a Quickmap
-
In the Map Layers panel, select the currently applied Quickmap name.
-
Select New Quickmap.
-
Enter a name for the Quickmap.
-
In the Layers From field, select an existing Quickmap to import its layer configuration as a starting point.
-
Check Default if you want this Quickmap to be applied automatically when you open Tactical Analyst.
-
Select Save Quickmap.
Configure Quickmap layers
-
Expand the layer groups and toggle on the layers you want included in the Quickmap.
-
When finished, select the save icon to save the layer configuration to the active Quickmap.