Create an Incident
Incident creation is not available to all customers.
Incidents are automatically added to TA from your Computer-Aided Dispatch (CAD). However, additional incidents can also be created and edited in TA. This can be useful for multi-hazard incident management as well as training exercises.
Incidents created in TA do not sync to your CAD.
-
Open the Incident List from the Main Toolbar.
-
Click the + button to open the Create Incident panel.
-
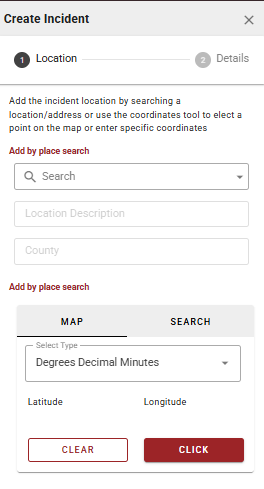
Set the incident location using one of the following methods:
-
Search by place - Enter an address or place name in the Search bar.
-
Click on map - Select the Map tab, then click Click and select a point directly on the map canvas.
-
Search by coordinates - Select the Search tab, choose a coordinate type from the Select Type dropdown, enter the Latitude and Longitude values, and click Search.
-
-
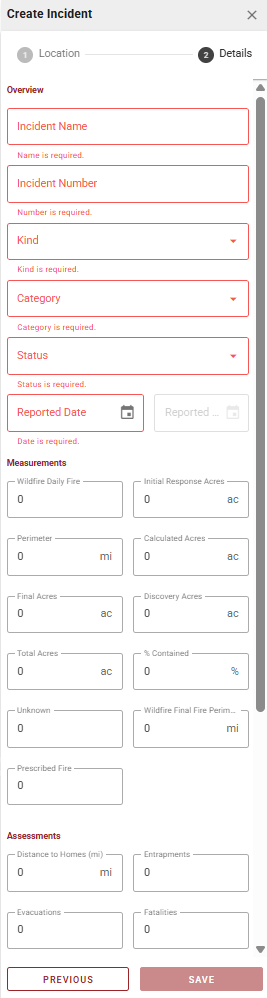
Click Next to proceed to the Details step.
-
Complete the incident details. Required fields are marked and must be filled before saving. Measurements and Assessments fields are optional.
-
Click Save to create the incident.
Edit an Incident
-
Select and open the Incident Card.
-
Select the Details tab.
-
Select the red Edit button at the bottom right-hand corner of the Incident Card.
-
Edit the Location and Details as needed.
-
Click Save.
Only incidents created in TA can have the details or location edited.
Map an Incident
The Incident Mapping List displays all mapping features for the selected incident and board, grouped by geometry type (point, line, polygon, and labels). Access it by selecting the Mapping tab on the Incident Card.
Select the Refresh icon at the top of the Mapping tab to reload the feature list with the latest data.
Select the visibility icon next to any feature to hide or show it on the map canvas. Filters applied to the mapping list also apply to the Map Canvas and the Incident Mapping Grid simultaneously.
Filter Features
-
Open the filters panel from the Active Filters tool, the Mapping tab, or the Features Grid.
-
Select Mapping from the category dropdown if not already selected.
-
Select the filters you want to apply.
-
Select Apply Filters.
Create a Feature
Features can be created one at a time from the Mapping List, or in bulk from the Incident Mapping Grid using a draw session.
-
Select the Mapping tab for the selected incident and board.
-
Select the + button in the lower right of the Mapping List.
-
Select the draw icon.
-
On the Draw tab, select the geometry type, then the standard and symbol.
-
Select Start Drawing and click on the map canvas to digitize the feature. For points or labels, select Search to enter coordinates instead.
-
Select Next.
-
Enter the feature details if needed.
-
Select Save.
Upload a Feature
Features can be uploaded directly to the Mapping List from a file.
-
Select the Mapping tab for the selected incident and board.
-
Select the + button in the lower right of the Mapping List.
-
Select the upload icon.
-
Select the file and select Open.
Supported file types: KMZ, KML, GeoJSON, ZIP Shapefile. ZIP Shapefiles may only contain the standard set of Shapefile files (dbf, prj, shp, and shx).
Edit a Feature
-
Select the Mapping tab for the selected incident and board.
-
Select the options icon next to the feature you want to edit.
-
Edit geometry by hovering over the feature on the map and dragging vertices or edges. Change symbology in the Draw tab, or apply transformations using the Transform option.
-
Select Save, or select the Details tab to edit attributes.
-
Select Save.
Share Features to Another Incident
Sharing a feature to another incident makes the same instance of that feature visible in the destination incident. Any edits to the shared feature will appear in both incidents. To create an independent copy instead, use Copy to Incident.
-
Select the options icon next to the feature.
-
Select Share to Incident.
-
Select the destination incident and board.
-
Select Share.
The Incident Mapping Grid can be used to bulk share features to another incident.
Copy Features to Another Incident
Copying a feature creates a new independent instance in the destination incident. Changes to the original will not affect the copy.
-
Select the options icon next to the feature.
-
Select Copy to Incident.
-
Select the destination incident and board.
-
Select Copy.
The Incident Mapping Grid can be used to bulk copy features to another incident.
Export Features
-
Select the Export icon at the top of the Mapping tab.
-
Select the export format.
-
Save the file to your device.
The Incident Mapping Grid can be used to bulk export features.