
Overview
This tutorial is comprised of two parts: setting up your interface, and the four workflows you will use throughout the day. Complete Part 1 once. After that, your settings will carry over between sessions and you can go straight to Part 2.
Part 1: Interface Setup
Step 1: Load Incidents with the Calendar Button
-
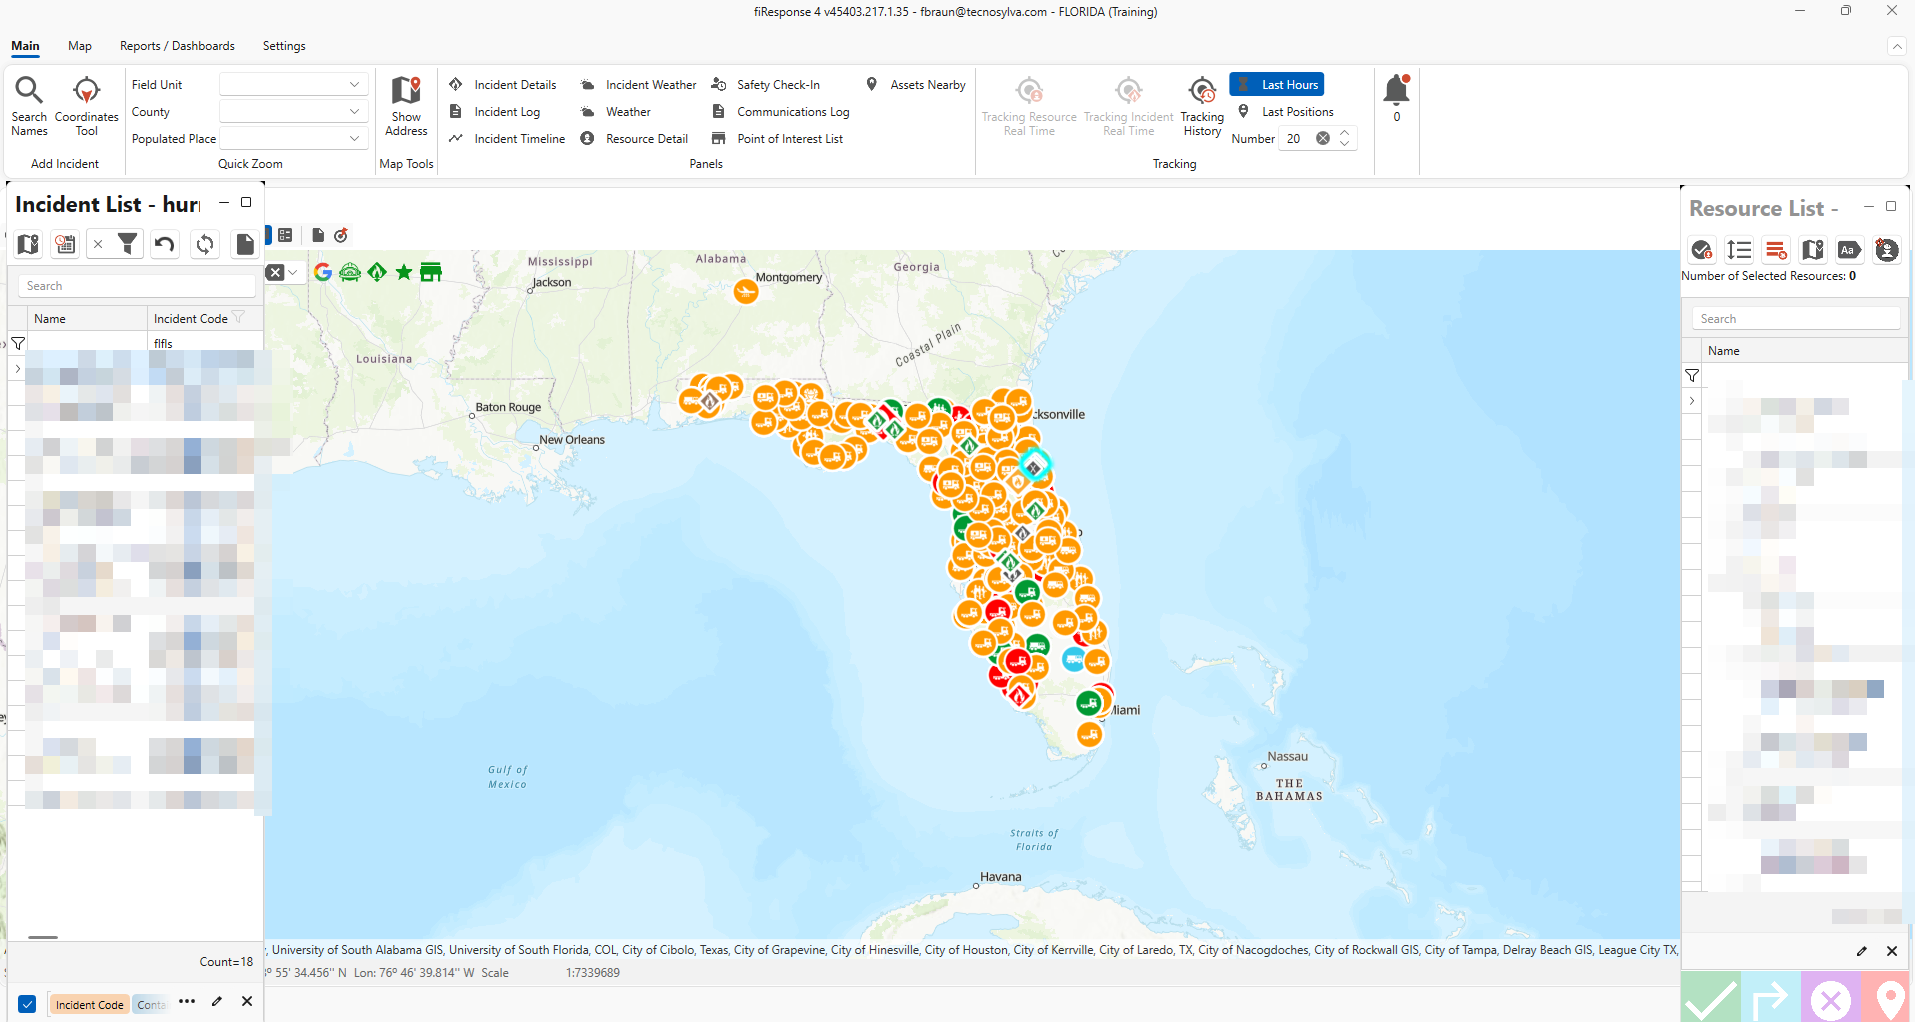
Open fiResponse Desktop. The screen will show three panels: the Incident List on the left, the Map in the center, and the Resource List on the right.
-
Locate the Calendar button at the top of the Incident List panel and click. A menu of options will appear.
-
Click Load All Incidents Last 6 Months. This is the recommended choice for daily use. The Incident List will refresh and populate.
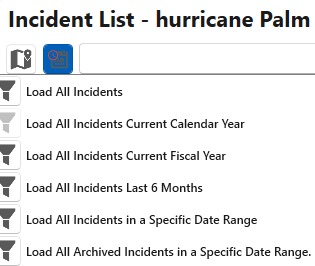
Use Load for a Specific Date Range when researching incidents from a particular period. Use Load All Incidents only when searching a large historical dataset where you are unsure of the date range, as it will increase load time significantly.
Step 2: Apply the Default Filter
-
Locate and click the Restore Default Filter button on the Incident List toolbar. The list will refresh and show only open and active incidents. Closed incidents will be removed from view.
If you are unsure what your default filter includes, ask your administrator. It is typically configured to show only incidents that are not yet closed.
Step 3: Apply a Column Filter (District, County, or Area)
This step narrows the Incident List to your specific area of responsibility.
Add the column if it is not already visible:
-
Right-click anywhere in the column header row of the Incident List.
-
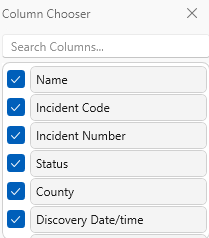
Click Show Column Chooser. The Column Chooser panel will open.
-
Find the column you want (for example, District or County).
-
Left-click and hold the column name, drag it into the Incident List column header row, and drop it in the desired position.
Apply the filter:
-
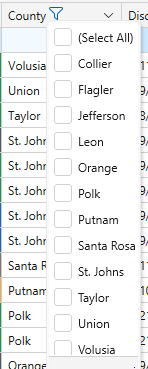
Hover over the column header you want to filter by (for example, District). A small Filter icon will appear. Click it.
-
Select your district, county, or area from the list. The Incident List will update immediately.
You can stack filters. For example, filter by District and then by Status to see only active incidents in your area.
Step 4: Save a Custom Filter (Optional but Recommended)
-
Set up your filters until the Incident List shows exactly what you want.
-
Click the Filter button at the top of the Incident List to the right of the search bar.
-
Type a name for the filter in the filter name field (for example, "My District Active").
-
Click Save. The filter will now appear in your filter list for future sessions.
To reapply a saved filter later: click the Filter button and click the filter name.
Step 5: Turn On Incidents Filtered on Map
-
Locate the Incidents Filtered on Map button on the far left of the Incident List toolbar.
-
Click it to toggle it ON (red). The map will now show only the incidents visible in your Incident List.
Leave this toggled ON (red) at all times during normal operations.
Step 6: Turn On Resources Filtered on Map
-
Locate the Resources Filtered on Map button on the Resource List toolbar.
-
Click it to toggle it ON (red). The map will now show only the resources visible in your Resource List.
Leave this toggled ON (red) at all times during normal operations.
Step 7: Filter the Resource List
-
At the top of the Resource List, use the available filter buttons to narrow resources to those relevant to your shift:
-
Filter to selected incident shows only resources assigned to the currently selected incident.
-
Filter to all selected resources shows only resources you have checked in the list.
-
If your administrator has set up global filters (by district or unit type), click the Filter button on the Resource List and click the appropriate filter name.
-
-
Locate the Keep Custom Filter button (lock icon) on the Resource List toolbar. Confirm it is disabled (black). When disabled, the Resource List automatically updates as you click different incidents. Leave it disabled.
Step 8: Arrange Panels
This step groups related panels as tabs so they stay in sync when you select an incident.
Recommended layout:
|
Position |
Panels |
|---|---|
|
Left side (tabbed together) |
Incident List, Incident Details, Incident Log |
|
Center (tabbed with map) |
Map, Communications Log |
|
Right side (standalone) |
Resource List |
To tab panels together:
-
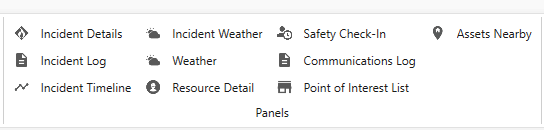
Click a panel name in the Panels section of the main toolbar to open it. Repeat for each panel you want to group.
-
Left-click and hold the title bar of the panel you want to move.
-
Drag it slowly toward the target panel. Docking guides will appear after a moment.
-
Position your cursor over the center docking guide (the square target in the middle of the target panel).
-
Release the mouse button. The panel will appear as a new tab in that group.
-
Repeat for each panel you want to add to the group.
Once the Incident List, Incident Details, and Incident Log are tabbed together, clicking any incident in the list will automatically update both the Details and Log panels.
Part 2: Dispatcher Workflows
When a new call comes in, follow this sequence:
Create Incident > Dispatch Resources > Edit Incident Info > Log Entry
Workflow 1: Create an Incident
Use this workflow when you receive a report of an emergency that does not already have a record in fiResponse.
Have the following ready if possible: incident address, incident type, reporting party name and phone number, and any known size or scope information.
-
Click in the map panel address bar at the top of the map.
-
Type the incident address and press Enter. The map will navigate to that location.
-
Confirm the location looks correct on the map.
-
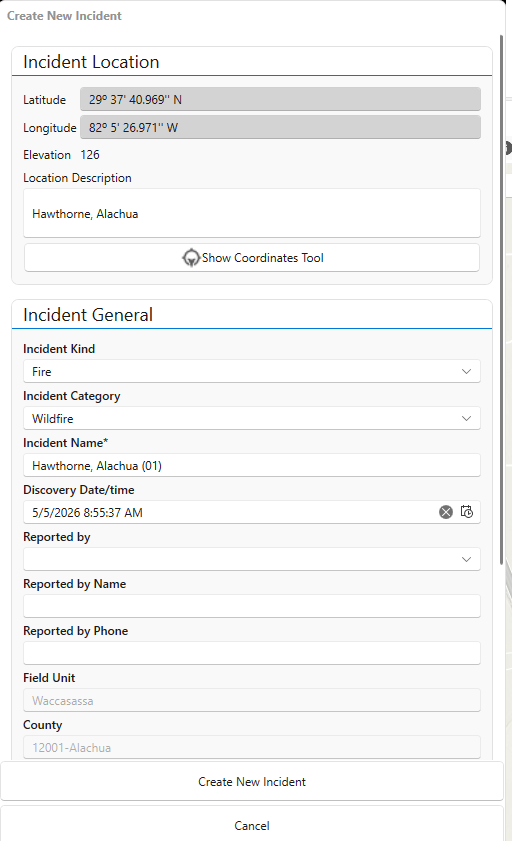
Right-click on the map at the preferred location and click Create New Incident.
-
Fill in the required fields:
-
Name (Incident Name will populate based on requested configuration, but it can be changed)
-
County
-
Incident Kind (for example, Fire)
-
Category (for example, Wildfire)
-
Incident Type (for example, Type 5 Incident)
-
-
Set Status to Reported. Read more about Fire Incident Status Definitions.
-
Click Save. The incident will appear in the Incident List and as a marker on the map.
If you do not see the new incident in the list after saving, check that your active filter is not excluding it. Click Restore Default Filter to confirm.
Workflow 2: Dispatch Resources
Use this workflow to assign and send resources to an existing incident.
-
Click the incident in the Incident List to select it.
-
The Resource List on the right will update (Ensure the “Keep Custom Filter” button is disabled, if it is red then it is enabled) . Use the filter buttons at the top of the Resource List to narrow to available resources. For example, filter by Dispatch Status = Returned to find resources back at station. Read more about Resource Dispatch Status.
-
Click a resource row to select it. If resources are grouped (rostered), then selecting the parent resource will also select the child resource.
-
Click the green arrow (✅ ) button at the bottom of the screen to dispatch the resource. The status will change to Dispatched and the resource icon will appear on the map.
-
Click the blue arrow button at the bottom of the screen to mark the resource as En Route To.
-
As resources arrive, click the red location pin button to update their status to On Scene.

Workflow 3: Edit Incident Information
Use this workflow to update an incident record as conditions evolve.
-
Click the incident in the Incident List to select it.
-
Click Incident Details in the Panels toolbar, or click the Incident Details tab if it is already docked.
-
Update the relevant fields:
|
Field |
When to Update |
|---|---|
|
Status |
Change from Reported to Active once resources confirm the incident. Read more about Fire Incident Status Definitions. |
|
Total Acres / Forested Acres |
Update as size estimates come in from the field. |
|
Percent Contained |
Update as the incident commander reports progress. |
|
Incident Commander |
Click Set IC to assign from the personnel list. |
|
Incident Type |
Update if the incident escalates (for example, Type 5 to Type 4). |
|
Comments |
Use for notes that do not fit other fields. |
-
To access additional fields, scroll down and expand the collapsible sections as needed:
-
Incident Location - geographic and ownership details
-
General Fire Information - fire-specific metadata
-
Fire Behavior - field observations
-
Assessment - damage and impact data
-
Fire Cause - cause determination
-
IRWIN - interagency reporting fields
-
Fire Times - discovery, contained, and controlled times
-
Fire Costs - cost tracking
-
-
Save your changes.
Clicking a different incident in the list while Incident Details is open will automatically refresh the form to show that incident's data.
Workflow 4: Create an Incident Log Entry
Use this workflow to record radio traffic, field observations, status changes, and dispatcher notes. Log entries cannot be deleted after saving.
-
Click the incident in the Incident List to select it.
-
Click Incident Log in the Panels toolbar, or click the Incident Log tab if it is already docked.
-
Review the existing entries. Automated entries (for example, "Status Updated: Active") will already be present.
-
At the bottom of the Incident Log panel, locate the log entry form.
-
Confirm or adjust the Event Date/Time. It auto-populates with the current time on double-click. Change it if you are recording something that happened earlier.
-
Set Priority. Leave as Normal for most entries.
-
Set Restricted. Leave as False for standard entries. Set to True if the entry contains sensitive information that should be visible only to authorized users.
-
Type your message in the text field.
-
Click Save Log Entry. The entry will appear in the log list immediately.
Set as Restricted before saving if needed. You cannot change this after the entry is saved, and entries cannot be deleted.

Switching Between Incidents while Logging
-
Click the Incident List tab.
-
Click the new incident in the list.
-
Click the Incident Log tab. The log will now show that incident's entries.
-
Enter and save your log entry.
Start-of-Shift Checklist Summary
Interface setup (do once per session):
-
Click Calendar > Load All Incidents Last 6 Months
-
Click Restore Default Filter
-
Apply your district or area column filter, or load your saved custom filter
-
Confirm Incidents Filtered on Map is toggled ON
-
Apply Resource List filters
-
Confirm Resources Filtered on Map is toggled ON
-
Confirm panel layout: Incident List, Incident Details, and Incident Log tabbed together
When a new call comes in:
-
Search the address in the map address bar
-
Right-click on the map, click Create New Incident, and fill in the form
-
Click Create New Incident and confirm the incident appears in the Incident List
-
Select the incident and dispatch resources from the Resource List
-
Update Incident Details as information comes in
-
Log all significant radio traffic and decisions in the Incident Log